OSINT Investigations  ★    Contact us  ★   
Python resultaat

How to automate your Flickr searches?

In part 1 of this blog post, we showed you how to find users on Flickr using an email address. We have shown that you can use the Flickr public API key for this. In this blog post, we explain how to automate your search query using your own Python script.

First: does the API key still work?

In the previous blog post, we used a query to check if users on Flickr are linked to the email address davidjones@yahoo.com. The query we used for this is shown below.

https://www.flickr.com/services/rest/?method=flickr.people.findByEmail&api_key=3aac009af063175e4bb3623f9d3c557b&find_email=davidjones%40yahoo.com&format=rest

This query uses the public API key3aac009af063175e4bb3623f9d3c557b” from Flickr. In our previous blog post, we already indicated that this API key probably cannot be used indefinitely. This is correct, because when you run the above query you will see the error message below. In this error message, you will see the error code 100, followed by the message “Invalid API Key (Key not found)“. Thus, Flickr’s public API key no longer works.

Invalid API Key

Expiration of an API key

The API key that we used on April 23, 2020, unfortunately no longer works today. If you use public API keys, you will often find that an API key no longer works at some point. The usability can stop in different ways: for example, a key may no longer be valid after a x number of uses, or for example because the usability stops after a certain period of time.

Twitter user @OsintSupport (check out his awesome Chrome extensions!) has informed us that the public API key is replaced every 8 hours with a new API key. This means that the key is valid for about 8 hours. Moreover, the use of the API key would not be blocked on the basis of repeated use by a single user: the API key can therefore be used for many thousands of requests from the same IP address. And that makes the use of the API request interesting to automate.

Automate your searches

We are a big fan of manually performing OSINT research. Not only do we believe that you should not be dependent on the tools you use, we also prefer that you understand what you are doing. By understanding what you do, you often no longer need tools or you can develop tools that do exactly what you want. It is also very important that you also have control over the traces you leave on the internet. In addition, in legal proceedings you probably want to be able to explain what you are doing.

However, in some cases it can be useful to use tools. Tools can make your investigations more effective, and tools can show you things you can’t see with the naked eye. Tools can come in handy especially for collecting, processing and analyzing large amounts of data. Below we explain how to create a simple Python script to check if a Flickr account is linked to an email address.

Get started with Python

First of all: what is our goal? The purpose of using a Python script is to be able to automatically check for email addresses associated with users on the Flickr platform. It’s nice to check one single email address, but it is even more fun to investigate multiple email addresses. You already get it: by doing this automatically you save a lot of time. The steps below relate to using Python within a Windows environment.

Step 1: download and installation of Python
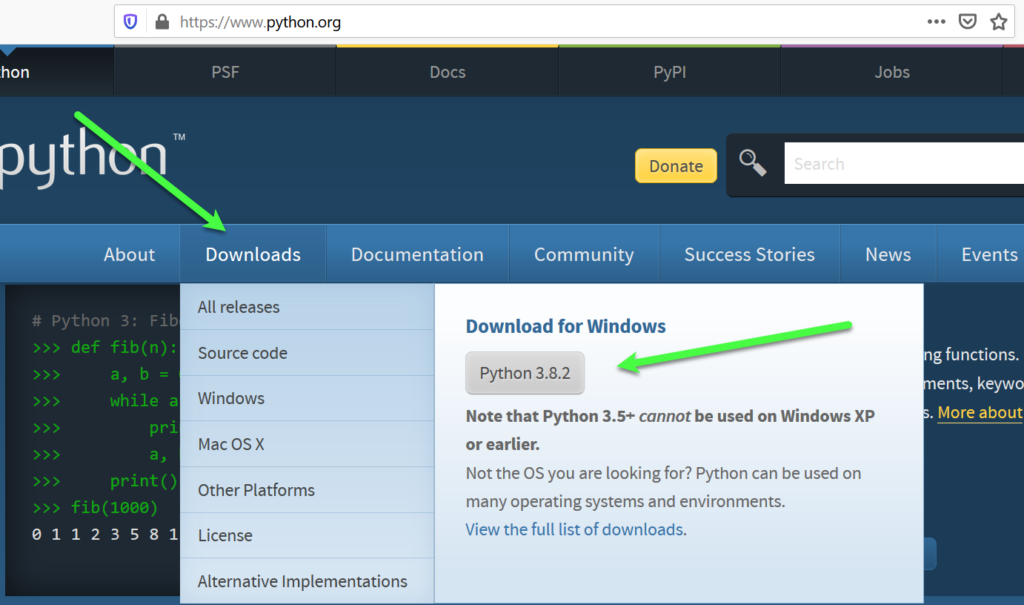
To create your own Python script, you must first download Python. Python is a so-called open source programming language that allows you to run applications, scripts and plugins from yourself and third parties. To download Python just navigate to the websites https://www.python.org/ and click on the “Downloads” button. Select the most recent version of Python (in our case 3.8.2) and run the installation wizzard.

Python downloaden

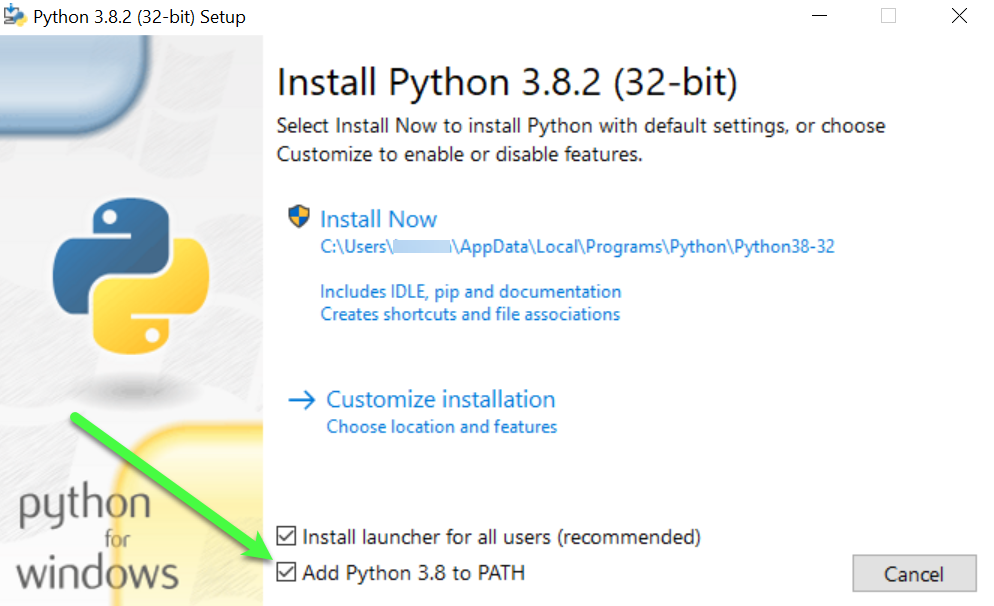
In the installation screen below, check the option “Add Python 3.8 to PATH“. This option ensures that you can also use Python from the Windows Command Prompt (CMD). Then click “Install Now” to install Python.

Python installeren

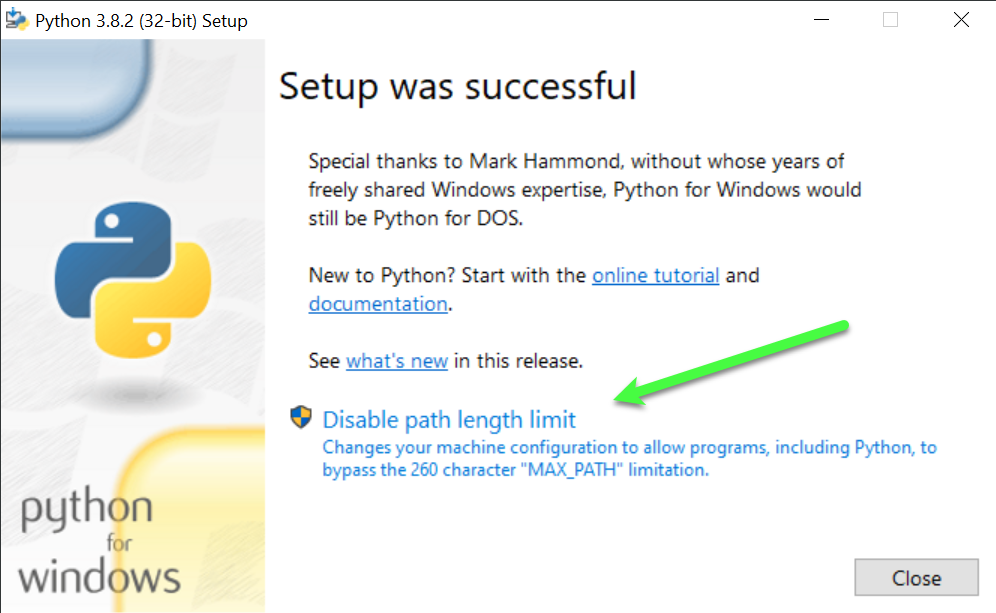
In the next screen click on “Disable path length limit“. This option ensures that adding Python to a directory with a path length greater than 260 will still work.

Python disable path lengt limit

Python is now successfully installed. To check if everything works, you can open your Windows Command Prompt by typing the letters “cmd” in the start menu and opening the “Command Prompt“. In the window that opens, type “python“. You will see the following. You are now almost ready to start writing your own Python script.

Windows CMD

Step 2: Download Notepad++

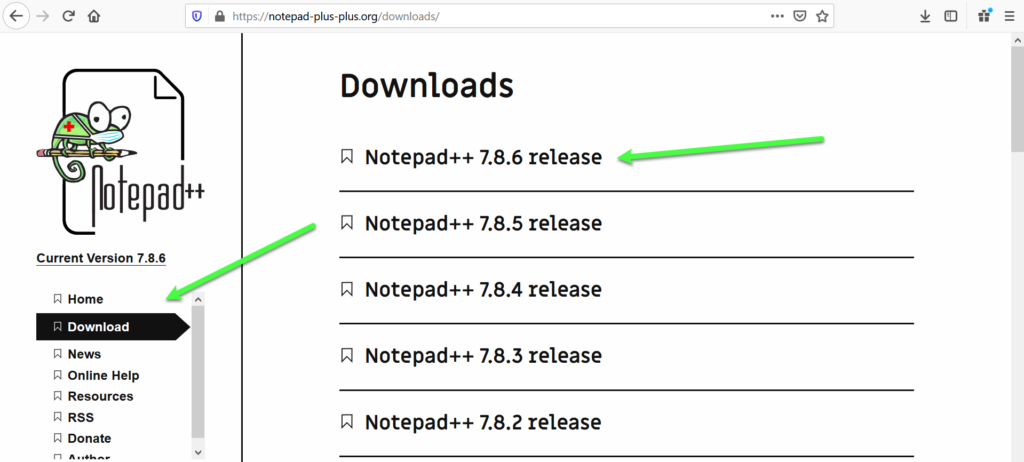
You have installed Python and you are now ready to write your own Python script. It is common to do this with special text and source code editing programs. In this blog post we use Notepad++  which can be downloaded via https://notepad-plus-plus.org/downloads/. Of course you can also use special Python IDE’s like Pycharm. Please select the program that you find most comfortable working with.

Notepad++ downloaden

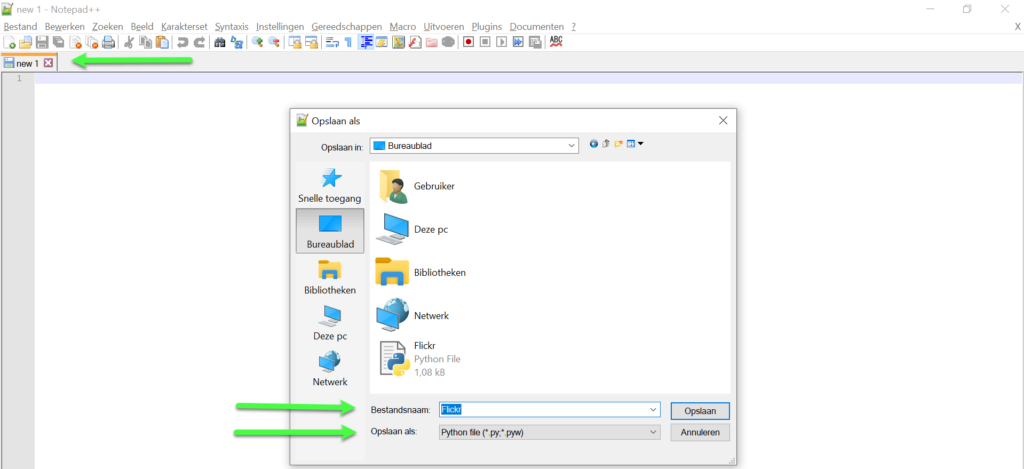
Open Notepad++, click on “File” and then “Save As“. Choose a name for your file (we chose the name Flickr) and save the file as a “Python file (* .py, *. Pyw)“.

Notepad++

You have now created a Python file that you can run later. You will now have to fill the file itself with the content of your script.

Step 3: Download the Request-library

With the open source programming language Python you can use existing code. This code is sometimes included in Python and sometimes not included. Code that is included can be used immediately after importing the code, code that is not included must be installed first.

The so-called Requests library that allows you to send HTTP requests is an example of a code that is not included by default in Python. You must therefore install this library before you can use it. This can be done as follows.

Open your Windows Command Prompt and type in the following command:

Pip install requests

You will now see a lot of movement in your screen. You have given the command to Python built-in program PIP to install the “requests library“. Please wait for the installation. In the example below you can see that the Requests library is already installed with us.

PIP install requests

If you are asked to update your version of PIP, enter the command below.

python -m pip install --upgrade pip

Step 4: Import the Requests-library

In the previous step you have installed the Requests library. To use the Requests library, you still need to import the module. We recommend that you use the # symbol before every line of code and add a description of what you will be doing. Everything stated after the # symbol will not be executed as code. Open your Python file and type in the following command:

import requests

Import requests

Step 5: Define the URL

You can use the Requests library to send HTTP requests. Instead of your web browser sending a request to a web server, you can now have this request executed by your Python script. You must of course specify the URL of the website you wish to visit. The URL you want to use is the query we used in our previous blogpost:

https://www.flickr.com/services/rest/?method=flickr.people.findByEmail&api_key=3aac009af063175e4bb3623f9d3c557b&find_email=davidjones%40yahoo.com&format=rest

However, because the API key of this query turned out to be no longer valid, we have a new query below that will make the request work again.
If you want to do this yourself, you will have to use Flickr’s public API key again or obtain a private key yourself.

https://www.flickr.com/services/rest/?method=flickr.people.findByEmail&api_key=f402aa5bec41484e322830c07b853ddc&find_email=davidjones%40yahoo.com&format=rest

In your Python script, enter the following command to create the variable “url” and to assign content (the URL) to this variable:

url = 'https://www.flickr.com/services/rest/?method=flickr.people.findByEmail&api_key=b51834379b8a3b68db81bf2ea953a03e&find_email=davidjones%40yahoo.com&format=rest'

Python url

Step 6: Run the request and save the response in a variable

In this step, you use the imported Requests module to send an HTTP request to the Flickr web server. The Requests module has a special function “requests.get(‘https://www.example.com’)” for this. By executing this function, an HTTP request will be sent to the website www.example.com. We would like to store the answer of this request in a variable. Use the code below to make a request to the URL you specify and save its response in the variable “response“.

#request uitvoeren en uitkomst in een variabele opslaan
response = requests.get(url)

Python antwoord in variabele opslaan

Step 7: Print the result

With the above script, you will send a request to a web server to retrieve a specific web page. You then will save the content of this web page in the variable “response“. You can now continue to use this variable or you can print the contents of it. In Python the functionprint()” can be used to print a string or any object. For example, with the command “print(“This is an example”)” the text “This is an example” will be printed. In order to print the content of the variable “response”, you will need to use the code below. Be careful not to use single or double quotes, these are only used to print a “string” (a piece of text).

#het resultaat printen (statuscode)
print(response)

Python print variabele

You may have noticed that we have included the comment “#print the result (status code)“. By printing only the output of the HTTP request, the content of the response is not shown, but only the status code of the response. The response status code is a response from the web server to our request and indicates whether the request has been received in good order (status code 2xx) or whether there is an error at the client (status code 4xx) or at the web server (status code 5xx).

We use the following code to print the content of the web page in text form.

#het resultaat printen (tekst)
print(response.text)

Python print variabele tekst

Step 8: Run the Python-script

With the above steps you have written a script that requests one specific URL from a web server. You then saved the answer from the web server (the result) in a variable and printed this variable. Your basic script is basically finished, so it is time to test whether your script works. You can do this as follows.

  1. Open the Windows Command Prompt;
  2. Typ in “cd Desktop”*;
  3. Typ in “python Flickr.py“.

Python bestand openen

*: in our example, the Python script is stored on the desktop. With the command “cd” (change directory) we opened the folder “Desktop”. If your script is stored in a different folder, first navigate to this folder.

Step 9: check out the results

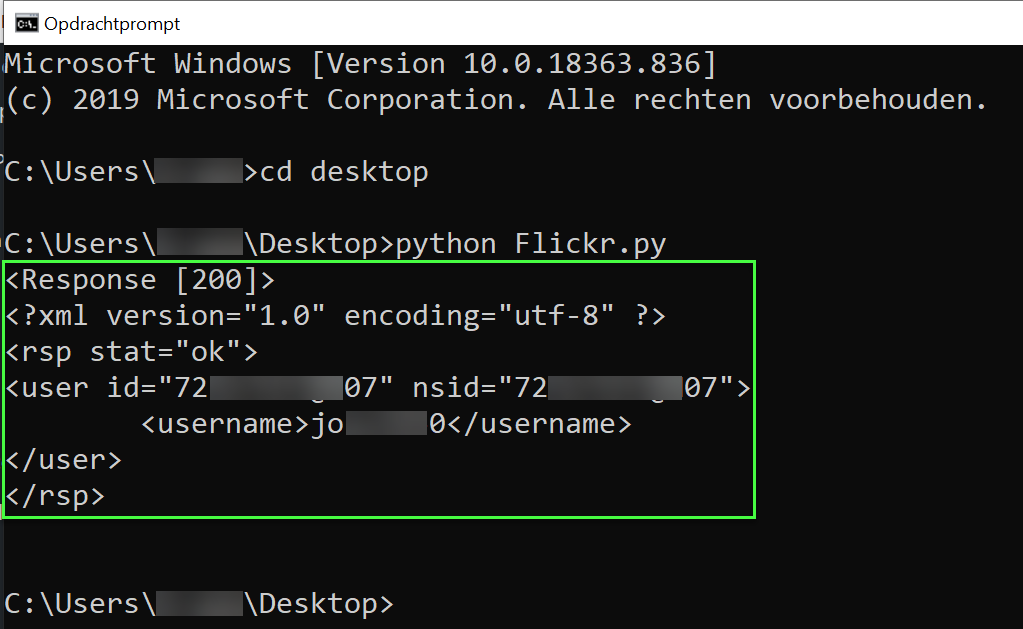
By running step 8, you will get the result below. First you will see the section “<Response [200]>“, which indicates that the web server has received, understood and accepted your request. This result corresponds to your “print (response)” command from step 7.

Immediately below that you will see the section “<?xml version=”1.0 “encoding=”utf-8” ?>“, “<Rsp stat=”ok”>“, “<user id=”72xxxxx07 “nsid=”72xxxxx07”> “,”<username>joxxxxx0</username>“, “</user>” and “</rsp>“are listed. This part is the text of the result, which part corresponds to your “print(response.text)” command from step 7. From this result you can read the user name and user ID of the user associated with the email address you entered.

Python resultaat

And what’s next?

With the above steps, you have created a very basic Python script that allows you to check if a user on Flickr is associated with an email address. If this is the case, you will immediately see the username and user ID of the respective user.

However, the above script isn’t very useful yet, as using the Flickr API manually would probably have been faster than assembling this script. It is therefore now the intention to further adjust the script so that multiple email addresses can be entered, the results are cleaned and the results are saved. You can read more about this in our next blog post.